We showed in a previous article how to install BI Publisher Desktop. We continue the tutorial in this new article and we show how to design reports with Embedded BI Publisher
1. Create a rtf document with MS Word.
Open your Documents folder and create a new folder where you will save your models created for the R554102 batch application. We named it in the document “Analytics Publisher R554102-Qty On Hand.
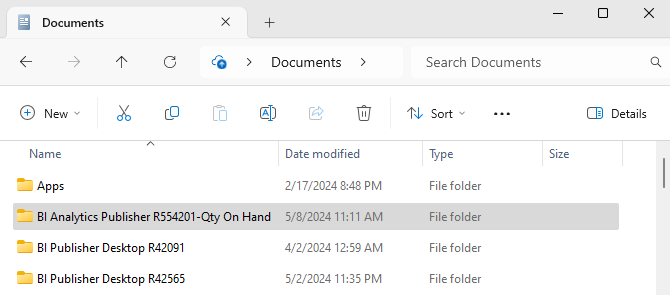
Figure 1
Open MS Word and create a new document.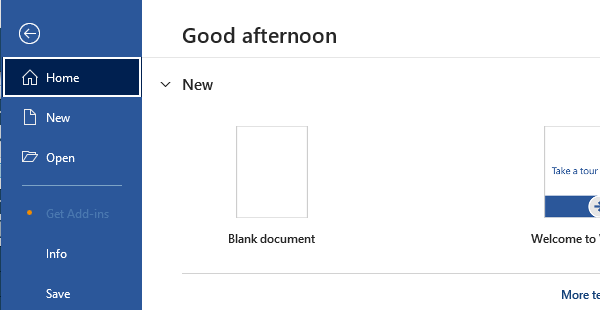
Figure 2
Save the empty document in RTF format as QtyOH_byBU.rtf in your folder.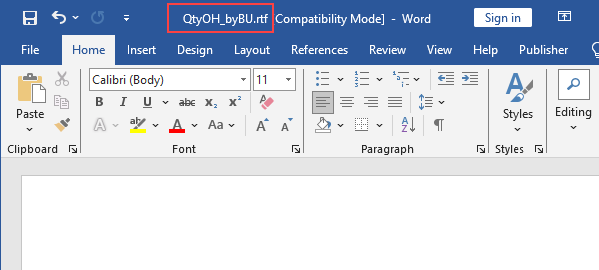
Figure 3
Exit Word.
2. Add an object to the BI Publisher Object Repository (P95600) using the template name
You must upload BI Publisher objects to JD Edwards EnterpriseOne before you can create report definitions for the desired output types. You use BI Publisher Object Repository (P95600) on either the web client or the Microsoft Windows client to upload templates, translations, localizations, and transformations into JD Edwards EnterpriseOne.
To upload BI Publisher objects,
you must add a new BI Publisher object to JD Edwards EnterpriseOne.
From the “EnterpriseOne Menus” select “EnterpriseOne
Life Cycle Tools” then “Report Management”, the GH9111 folder. The figure shows
the main folders and apps used in this demo.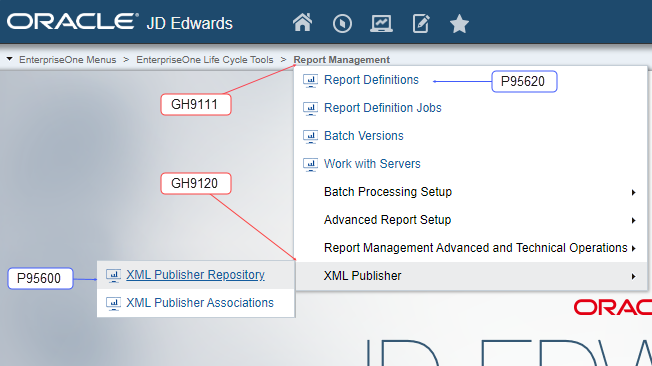
Figure 4
You will find “XML Publisher” where you can access to “XML Publisher Repository”.
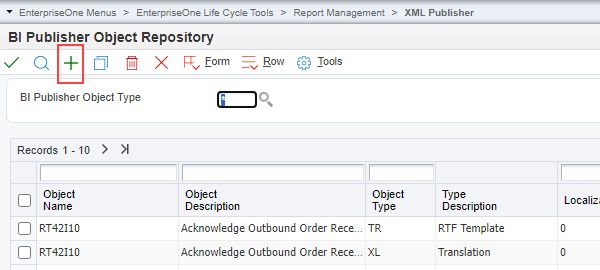
Figure 5
Oracle recommends that you use the Windows client to upload BI Publisher objects. However, if the web client is used to upload objects, you can modify the BI Publisher object size in the OWWEB section of the jas.ini using the following definition:
[OWWEB]
MaxFileUploadSize = 50
Select Add. Fill in as in the figure below.
Use the naming conventions recommended in the JD Edwards EnterpriseOne documentation for the Template name. The object description should include the purpose of the object.
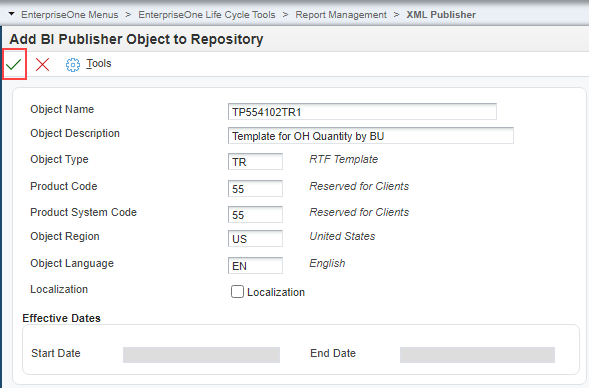
Figure 6
Click OK.
In next screen, click the Choose File button, browse to the folder created above and select the rtf file.

Figure 7
Click Load.
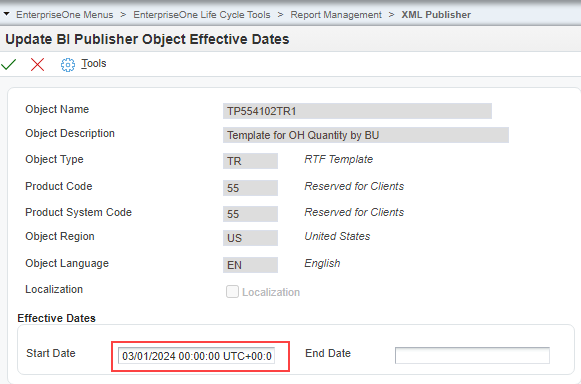
Figure 8
Select a date in the Start Date field and leave the End Date field blank. Click OK.
Effective Dates
Effective dates indicate when an object is available for use. If an object will be used indefinitely, you do not need to specify an end date.
Effective dates enable a company to have multiple, slightly different versions of the same template with the same name as the original template but with different start and end dates for each version.
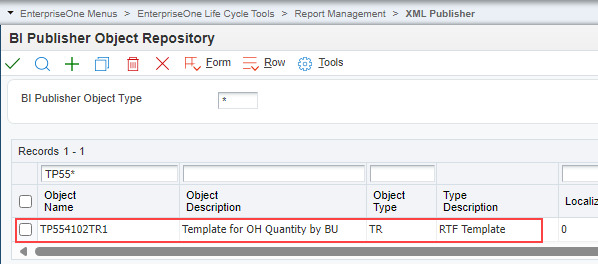
Figure 9
You can now see the BI Publisher Template object you just created in the BI Publisher Object Repository grid. Use QBE and click find.
3. Create a report definition in the JD Edwards BI Publisher Report Definition application (P95620), associating the source batch application (UBE) and the template

Figure 10
Open P95620-Report Definitions app.
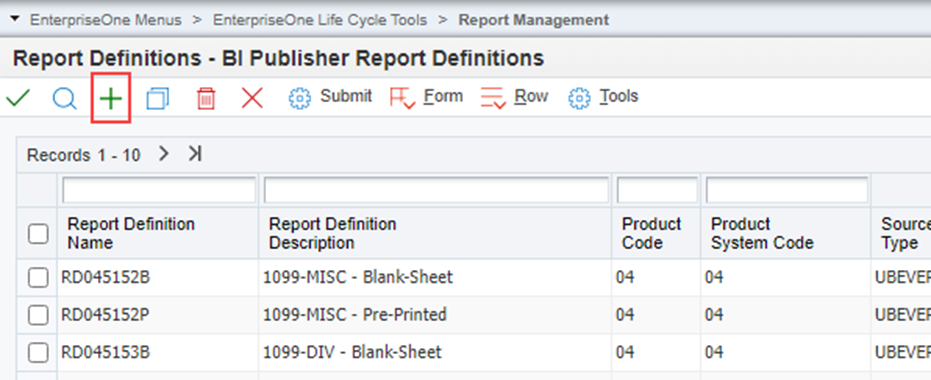
Figure 11
For the report definition name, use the naming conventions recommended in the documentation.
Click add and create a new Report Definitions RD554102A as in the screenshot.
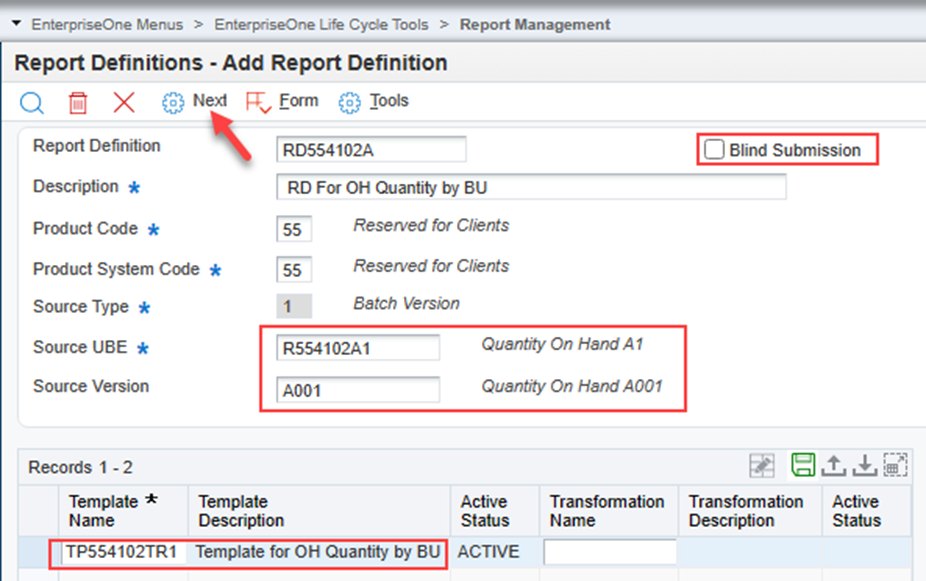
Figure 12
If the submission option value is empty, the submission is prompted. If checked, the submission is blind.
Click Next.
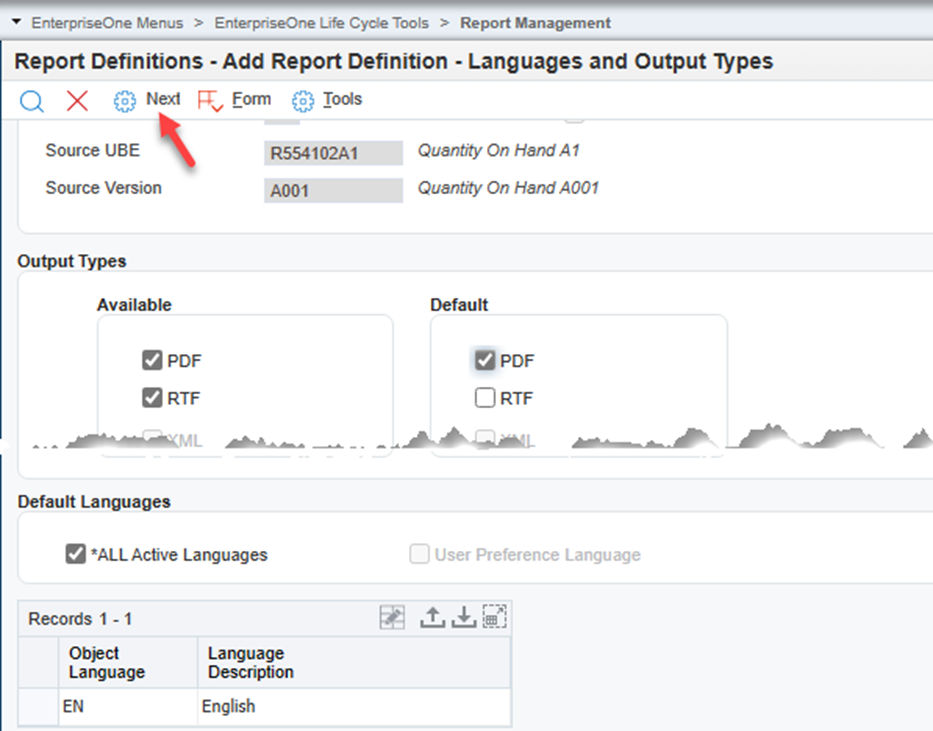
Figure 13
Click Next.
Defining Languages and Output Types
Access the Languages and Output Types form.
Note: The templates, translations, and localizations that are attached to the report definition determine the languages that appear in the Object Language column.
Available Output Types
Select the output types to be available to users when they are submitting the report definition. The type of template attached to the report definition determines which output types are available.
Default Output Types
Select the default output types that will be selected when the report definition is submitted. Default output types are not enabled unless they are first defined as available output types. If the report definition is defined as blind submission, the default values indicate the type of output that will be produced when the report definition is submitted to BI Publisher.
Note: When you run a report definition, the system does not automatically generate a PDF.
*ALL Active Languages
If this option is selected, all languages for the defined templates, localized templates, and translations that are active will process when a report definition is submitted to BI Publisher. Languages associated with the templates are displayed in the grid.
User Preference Language
If this option is selected, when a report definition is submitted to BI Publisher and the sign on user's language preference has been defined, the language preference for the sign on user is processed. A user's language preference is defined in the user's system profile.
The User Preference Language option is not enabled if *ALL Active Languages is selected.
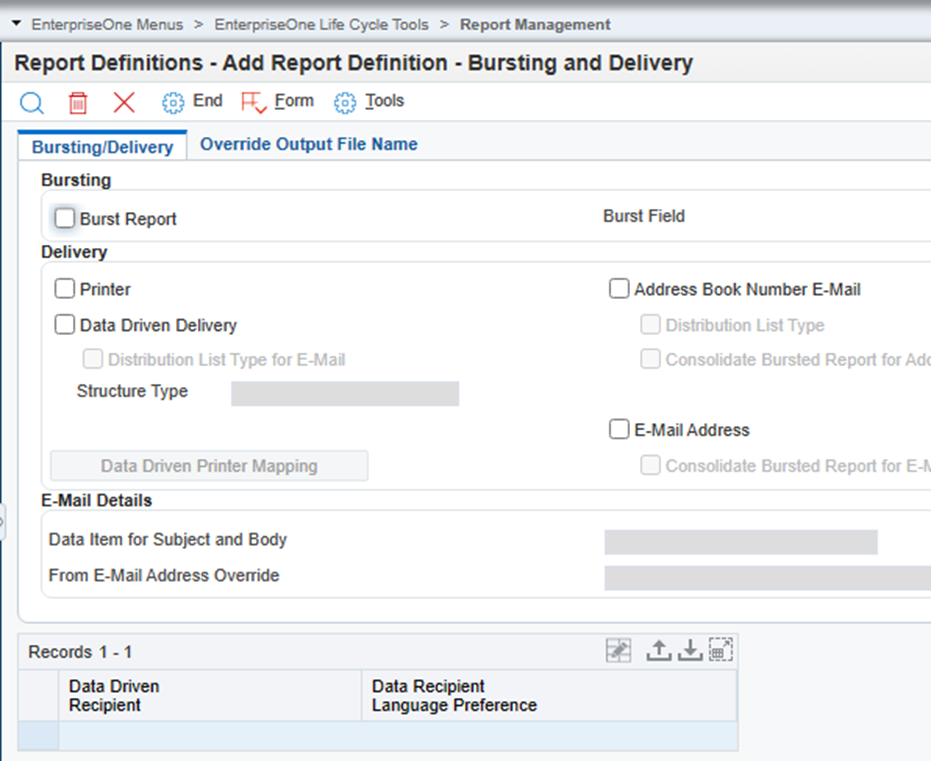
Figure 14
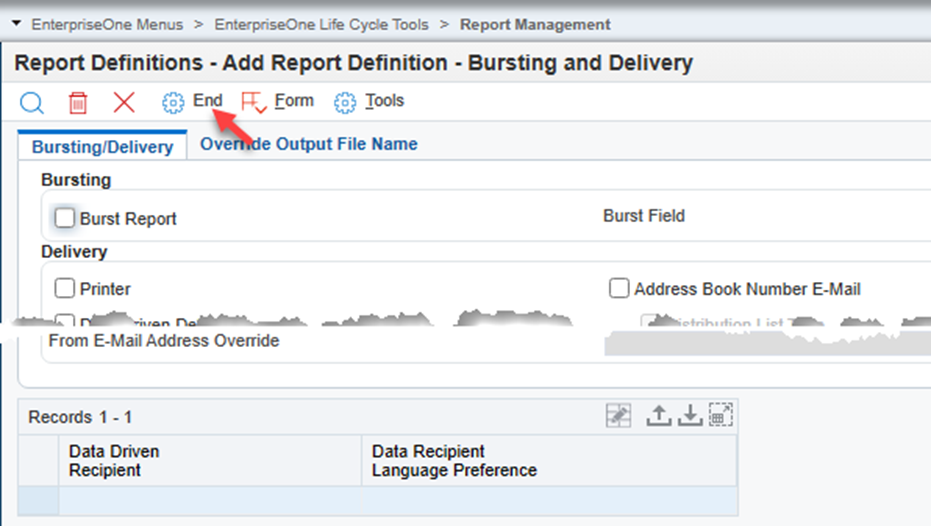
Figure 15
Click End.
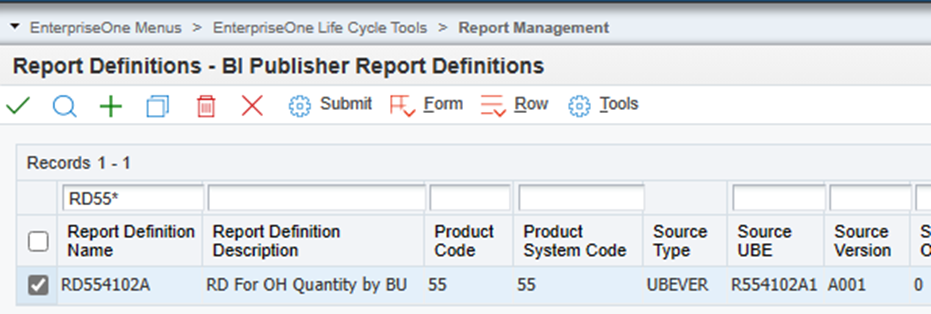
Figure 16
We have just finished configuring our Embedded Analytics Publisher report to generate data in XML format via JD Edwards EnterpriseOne batch applications. Now we will design the template with the MS Word Template Builder add-in.
4. Submit the report definition in BI Publisher Report Definition application (P95620)
Browse to Report Management menu or use the fast path to access to BI Publisher Report Definitions (P95620). Use QBE to search for the report definition.
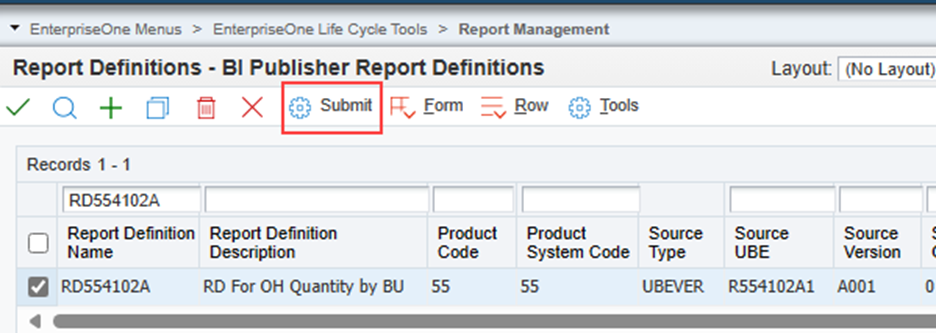
Figure 17
Select and submit the report definition.

Figure 18
Change your selection if necessary and submit.
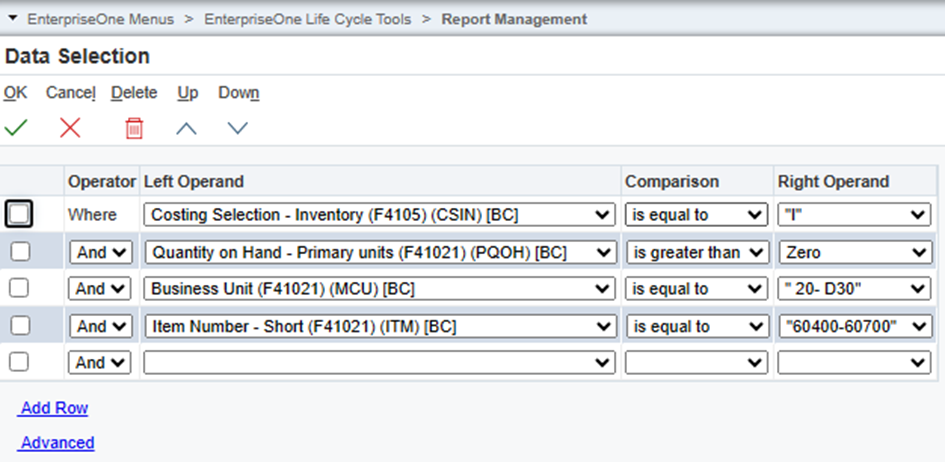
Figure 19
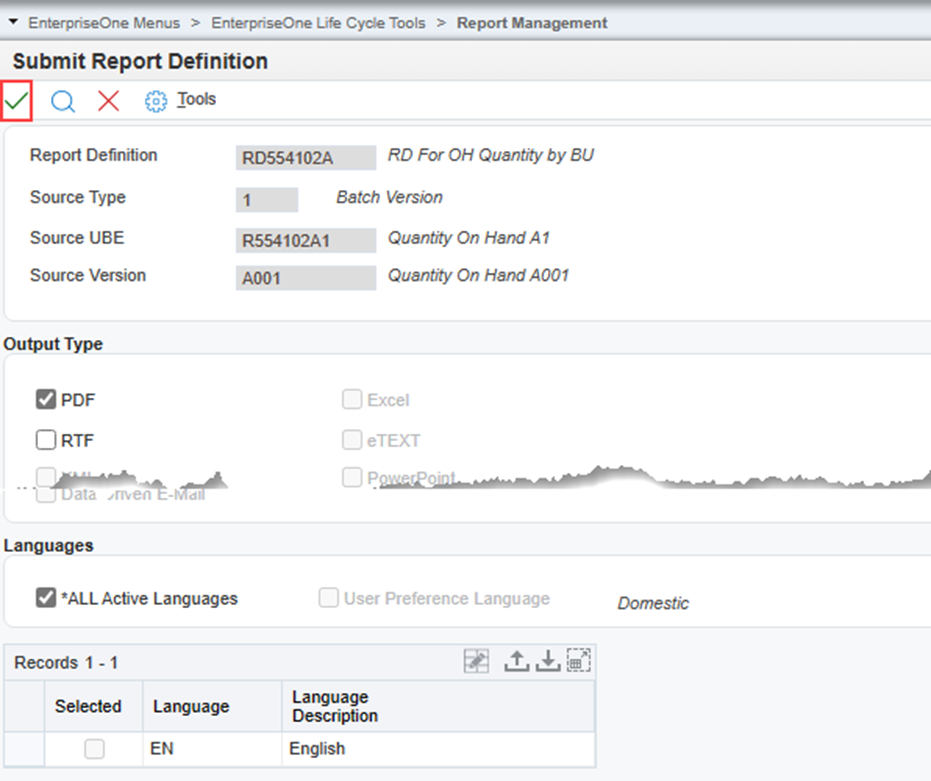
Figure 20
Click OK to submit.
A XML file is downloaded. Open your PrintQueue folder to locate the XML data file.
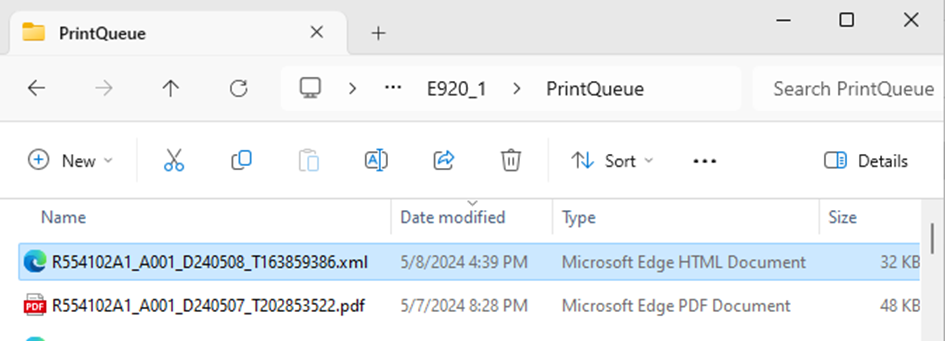
Figure 21
Download XML Notepad Software to view the XML File.
Once the software is installed, right-click on the XML file and select Open with XML Notepad.
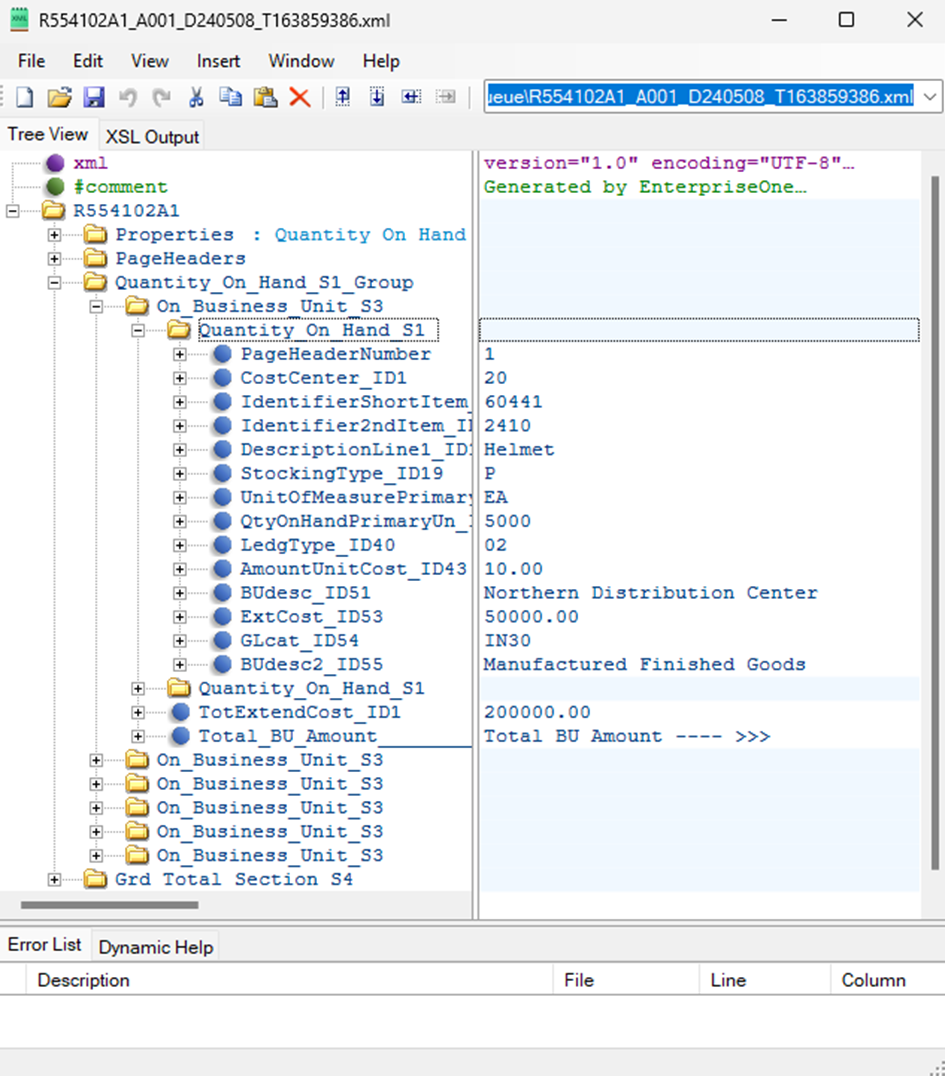
Figure 22
Expand in the left pane "Quantity On Hand S1 Group" and then the next element. You can see in the right pane the content of the first row of your report.
5. Design the template in the desktop application
- Open the blank RTF file we created above in MS Word.
- Select the Publisher tab.
- Click Sample XML on the Microsoft Word ribbon. Browse to PrintQueue folder and select the XML file.
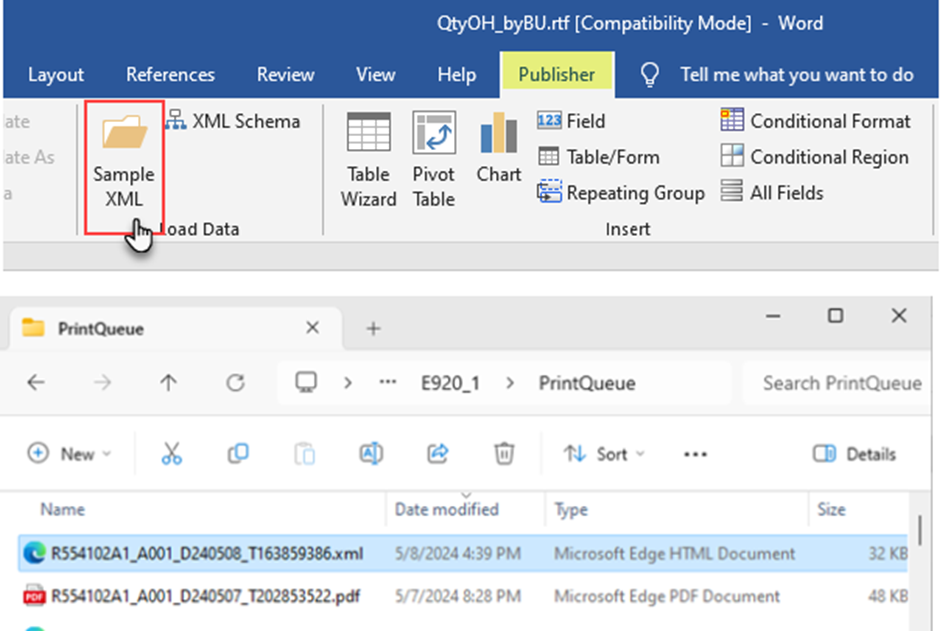
Figure 23
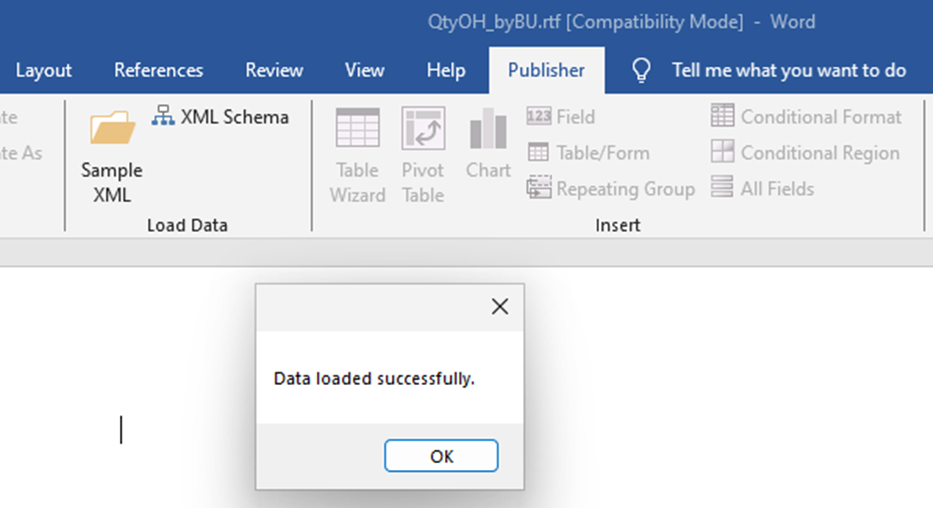
Figure 24
Once the data is loaded, select Table Wizard on the Publisher ribbon:
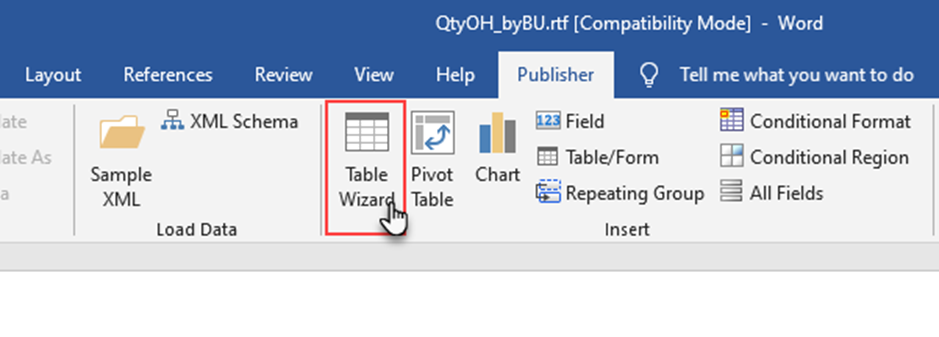
Figure 25
Continue following the Table Wizard:
Choose the Table option and select Next.
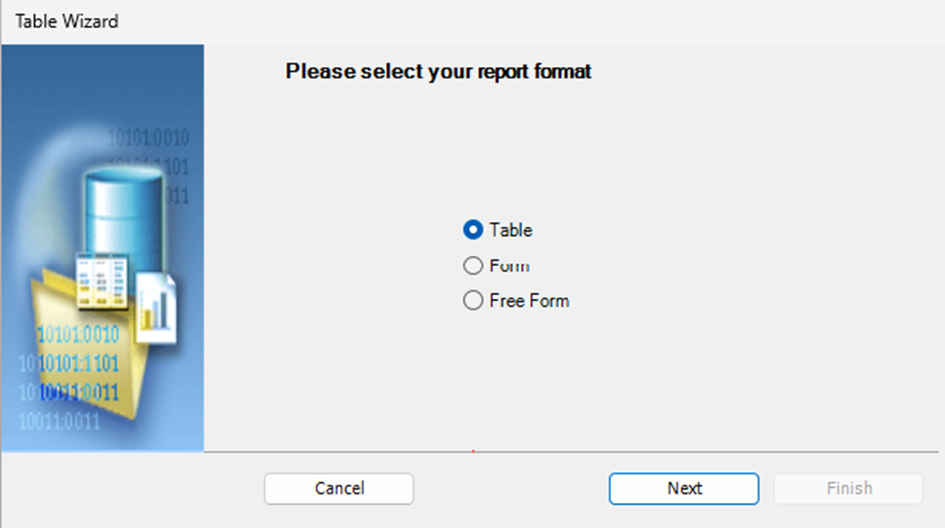
Figure 26
In the “Data Set” list box of next screen, select the details section of the batch application report and click Next.
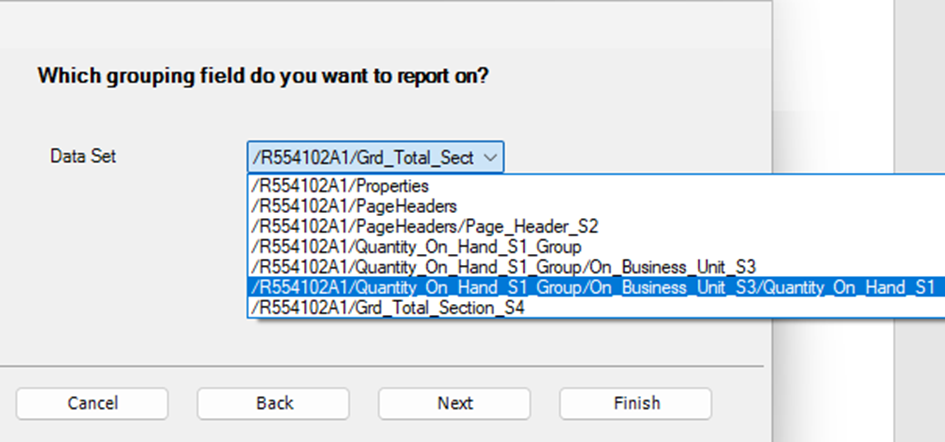
Figure 27
In this dialog you can select which columns you want to display in your table. Select the field in the left pane and click the > button. Repeat for the remaining fields, until your screen looks as shown above.
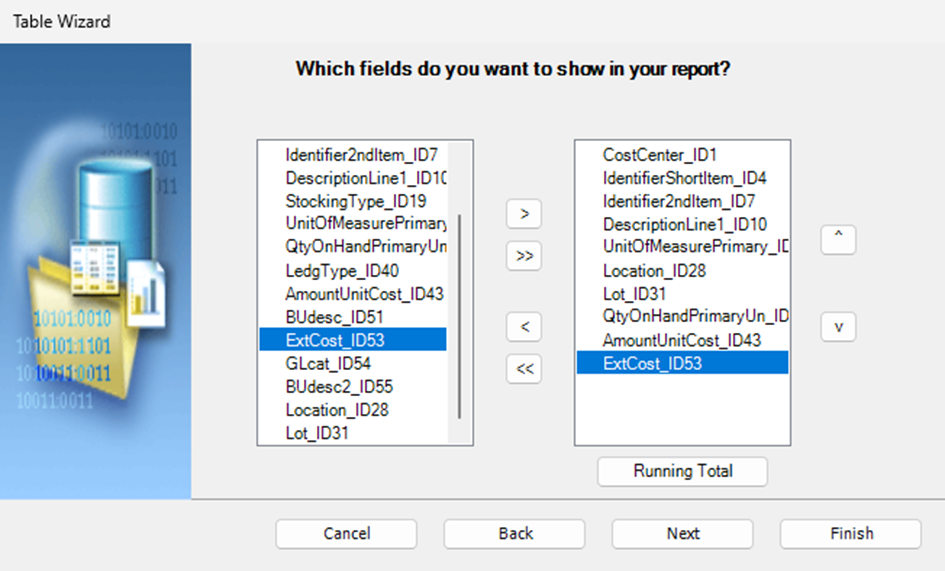
Figure 28
The remaining dialog steps allow you to group and sort the data.
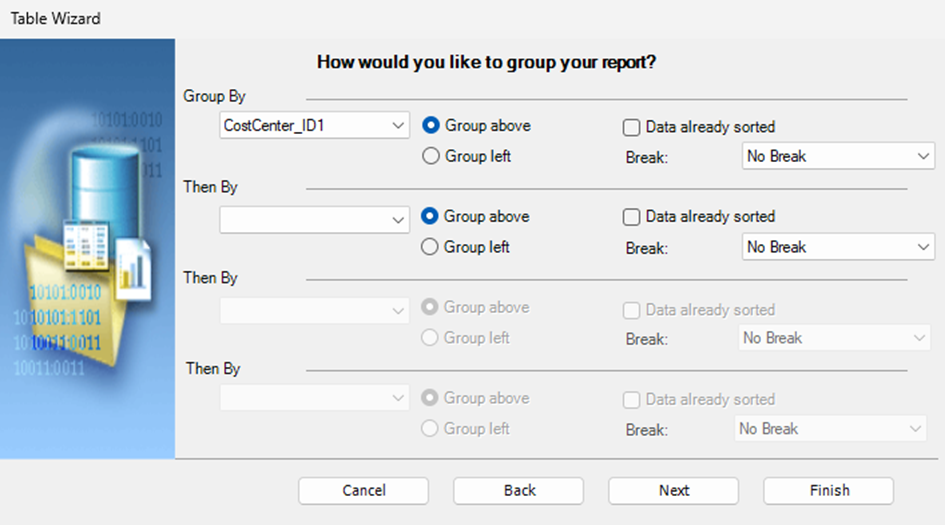
Figure 29
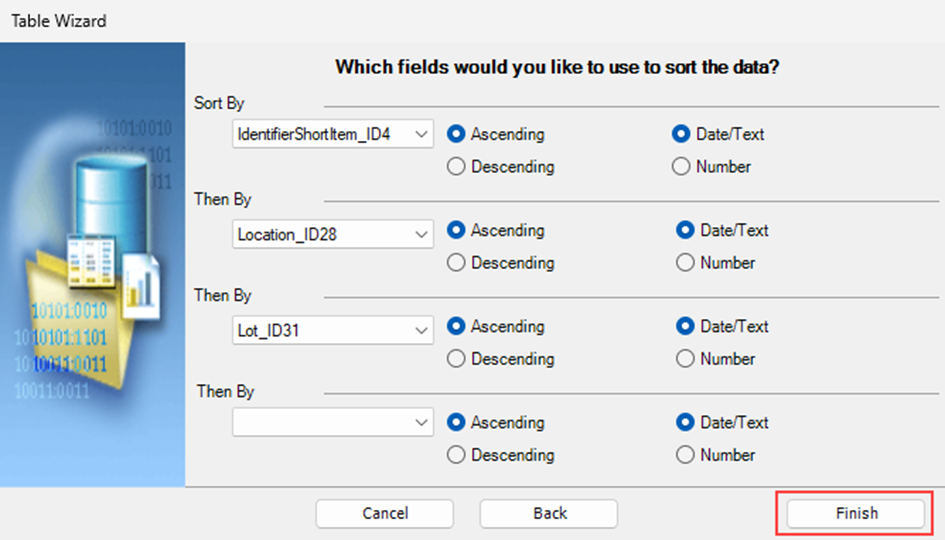
Figure 30
Click the Finish button to create the table.
The inserted table should look like this:
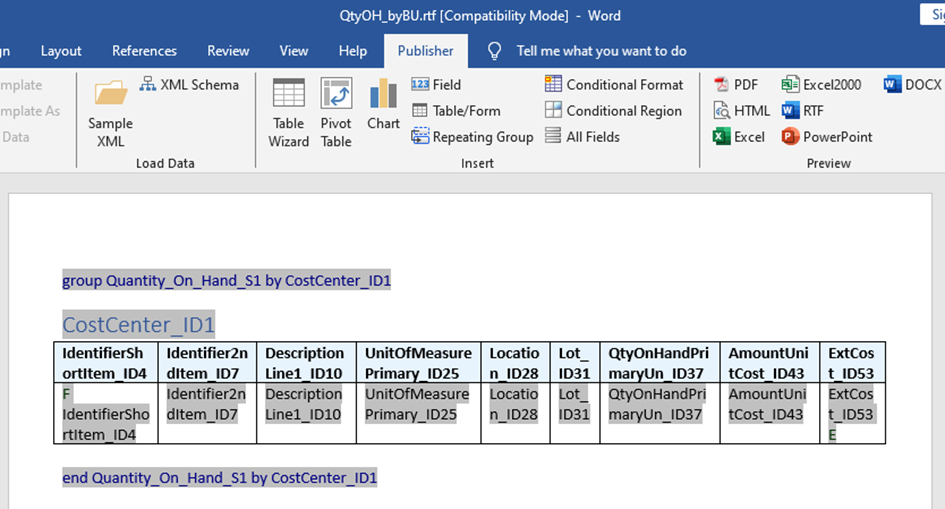
Figure 31
Form fields representing data elements are replaced with the data when the template is processed. The F and E form fields indicate a repeating section. The section of the document encapsulated by these two form fields is repeated, if the associated data element is found repetitively in the data.
You can now format these elements in Microsoft Word and add additional text. You can also move fields around as long as you keep them in the surrounding F and E processing instruction. If you remove one of these processing instructions your template may not work anymore with Publisher.
Select the Field command and scroll to Quantity_On_Hand_S1. Drag and drop the BUDesc and ExtCost variables.
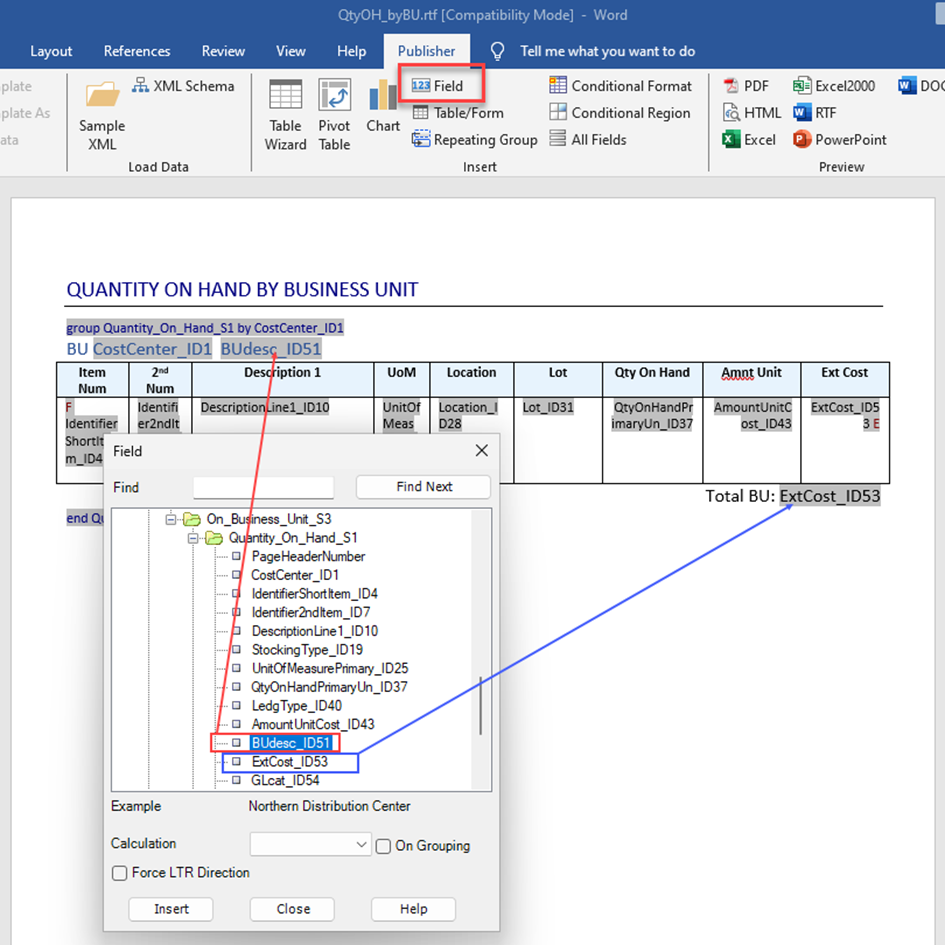
Figure 32
Right-click on the ExtCost data field to display the context menu.
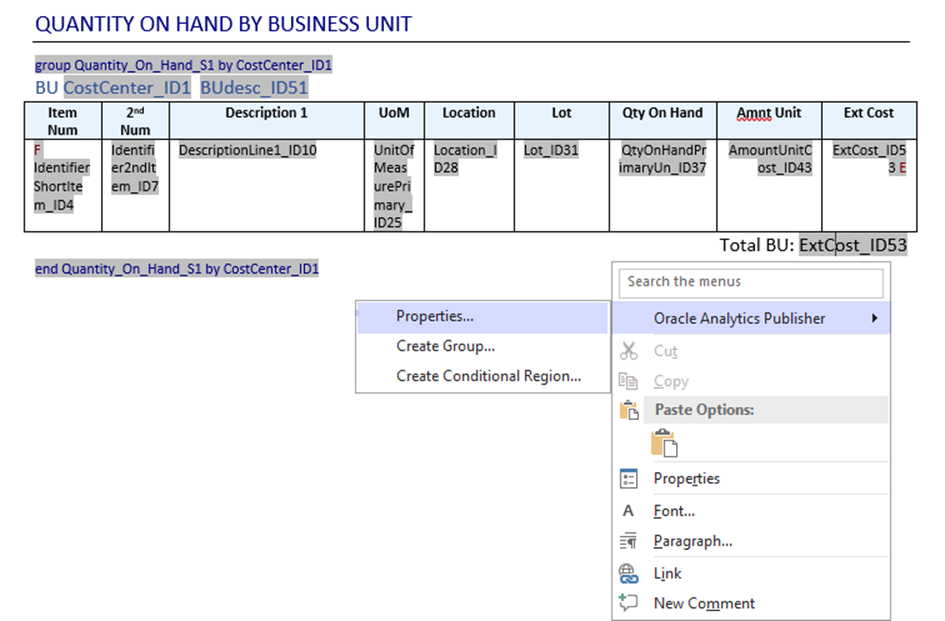
Figure 33
Select Oracle Analytics Publisher, then Properties to prompt the Properties form.
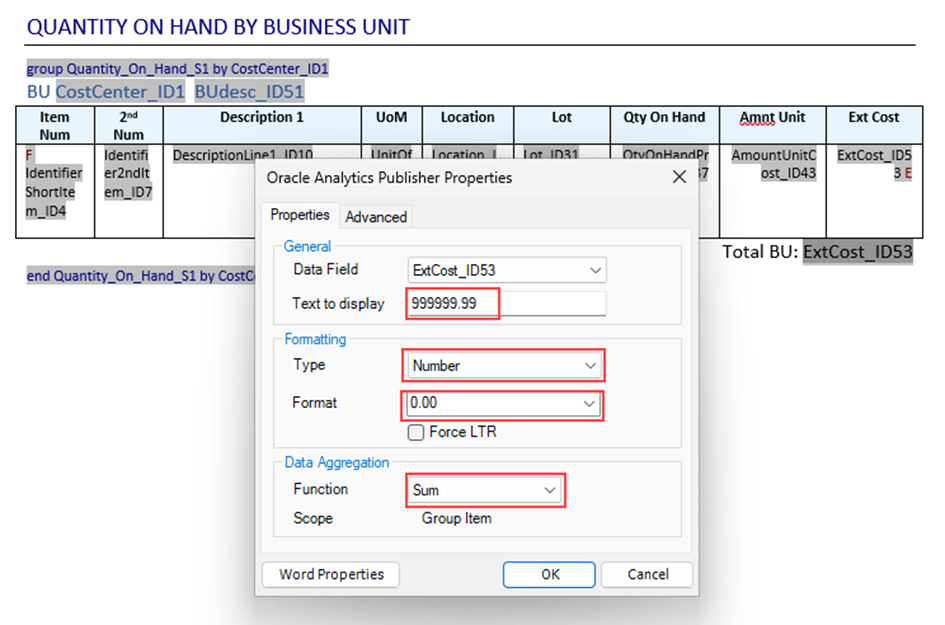
Figure 34
We insert the Grand Total. Add the description. Select the Field command, scroll down to Quantity_On_Hand_S1 and drag and drop the ExtCost variable.
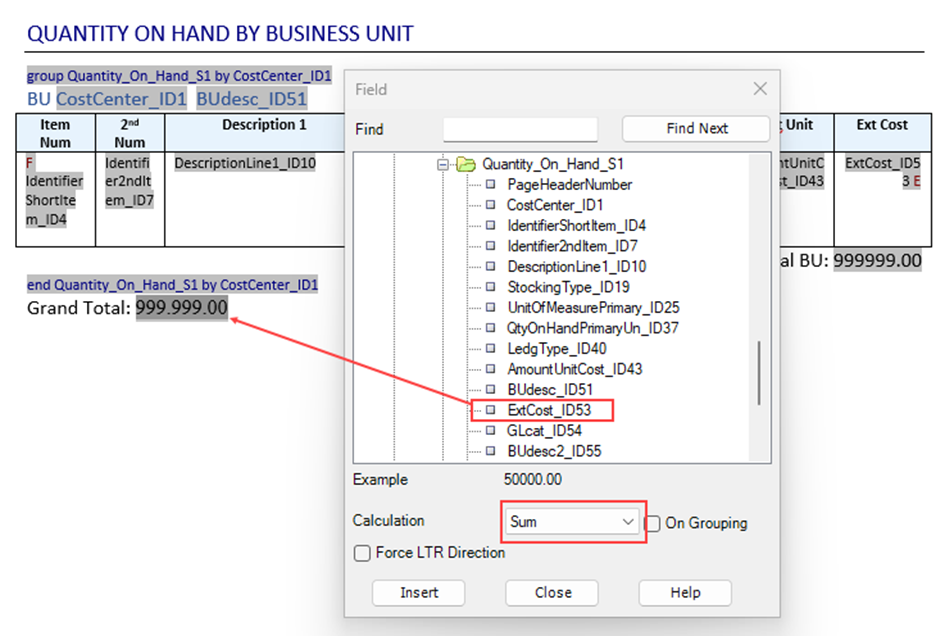
Figure 35
Double-click the field to display the Properties form and change the Format and Text to display.
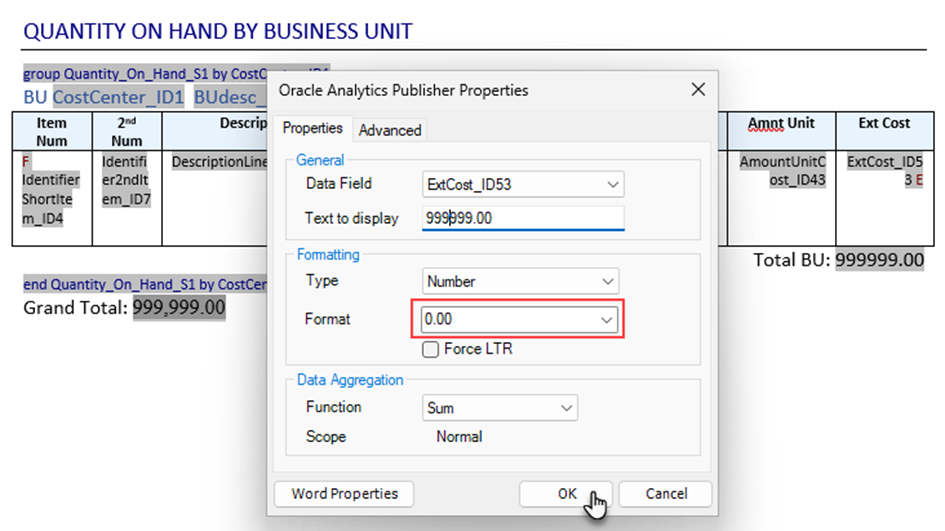
Figure 36
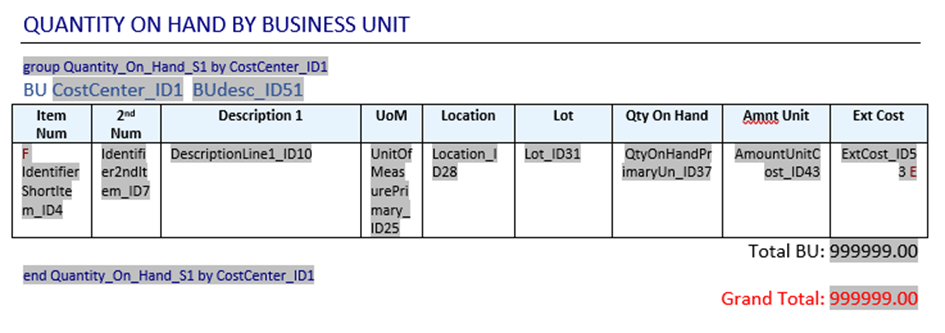
Figure 37
Save the template in the folder where rtf templates created with the R554102A1 batch application are stored. It can then be uploaded again with the P95600-XML Publisher Repository.
6- Once the template is done, upload the template back to the XML Publisher Object into BI Publisher Object Repository
- Open P95600-XML Publisher Repository app and select TP554102TR1 object.
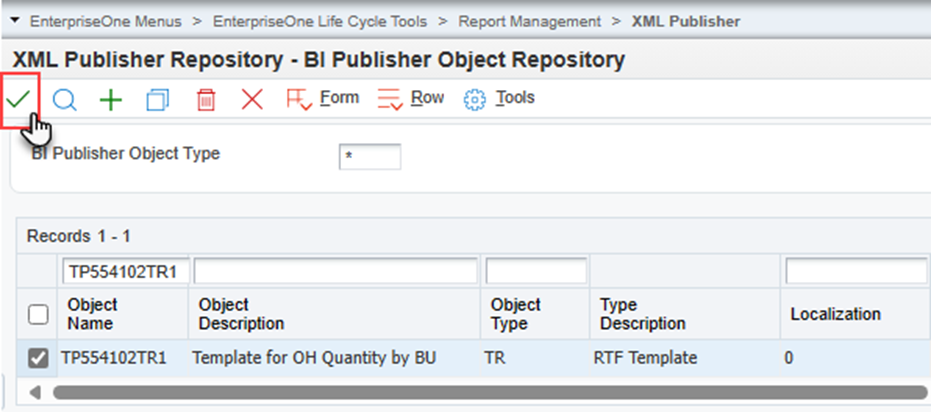
Figure 38
- Select OK on the next screen. The following message will be displayed. Click Yes.
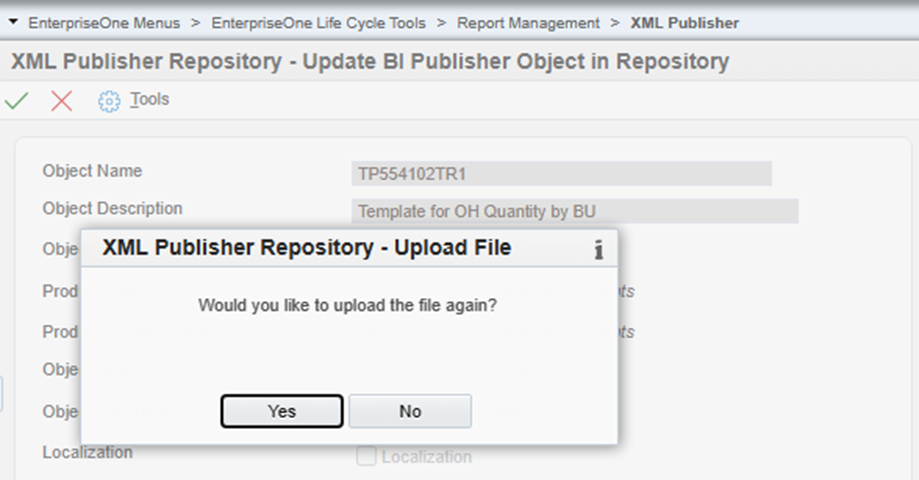
Figure 39
In the next screen, browse to the templates folder, select the rtf template and click Load.

Figure 40
Click OK to exit.
7. Submit once again the report definition with P95620 application
Enter P95620 in the Fast Path field to access to BI Publisher Report Definitions. Use QBE to search for the report definition.

Figure 41
Select and submit the report definition.

Figure 42
Change your selection if necessary and submit.
A new XML file is downloaded in your PrintQueue folder.
8. Download the RTF Template
- Open P95600- XML Publisher Repository. Search with QBE and select TP554102TR1 template.
- Click on the Row Exit menu or right click on the template and select Download.

Figure 43
- The browser's Downloads menu appears when the download starts. Click Show in folder.
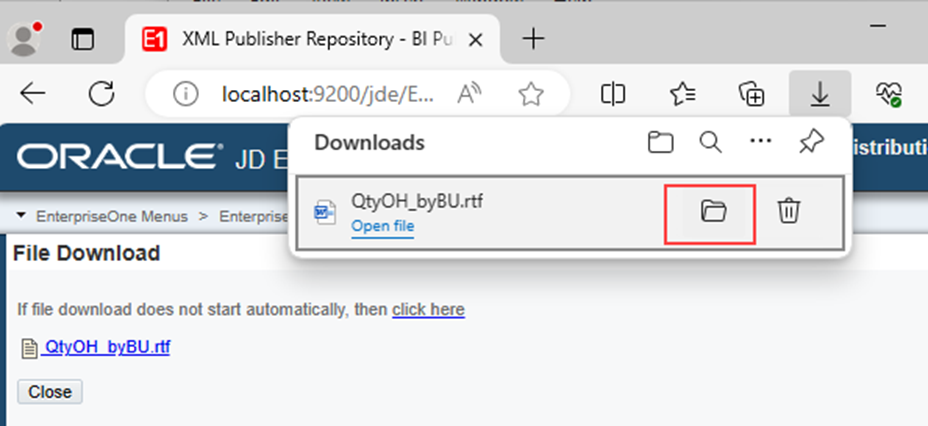
Figure 44
Selecting "Show in folder" opens PrintQueue folder.
The download operation copies the rtf Template report to the PrintQueue folder. It is this copied file which will be opened in Word when "Open file" is selected and with which the rtf Template will be designed.
Once the design is completed, the rtf Template report should be copied to the folder created above to store the templates for the same batch application.
It will then be uploaded again with the P95600-XML Publisher Repository.
- Open File.
- Click Open File in the browser's Downloads menu.
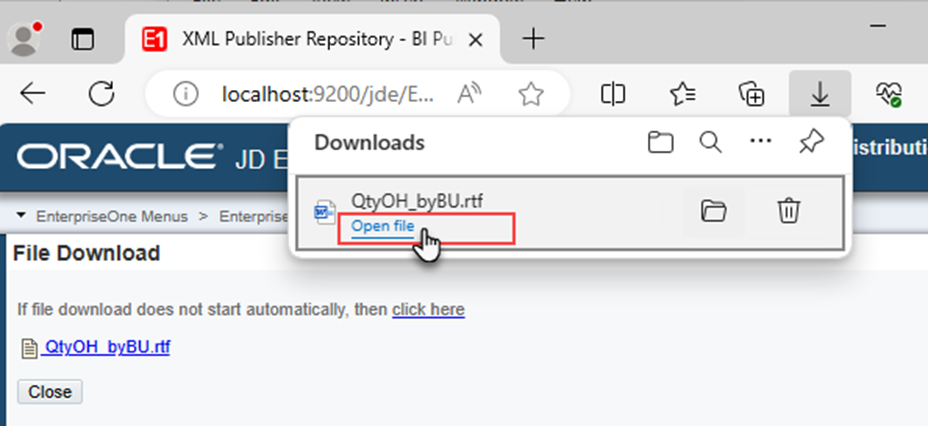
Figure 45
The rtf Template Report opens.
- Select the Publisher tab.
- Click Sample XML in the Load Data group on the Microsoft Word ribbon and browse to PrintQueue folder. Select the new XML file.
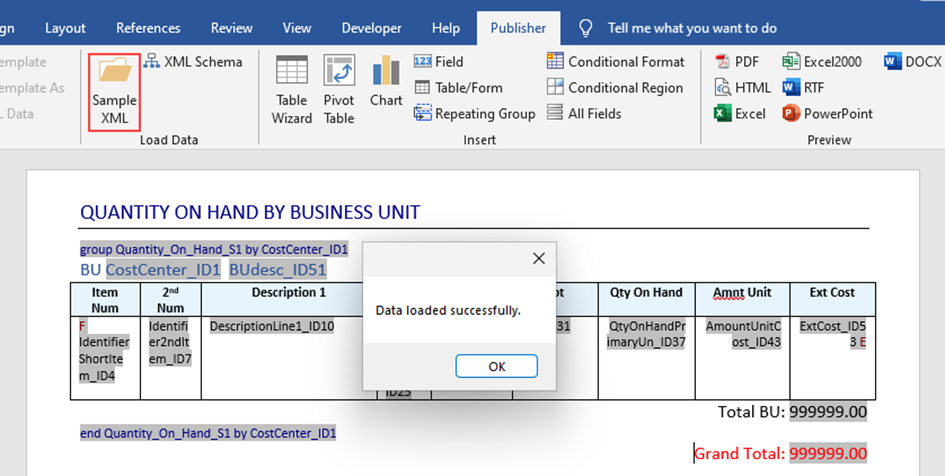
Figure 46
Click OK in the dialog box, and then select RTF in the Preview group to open the updated report with the new data.
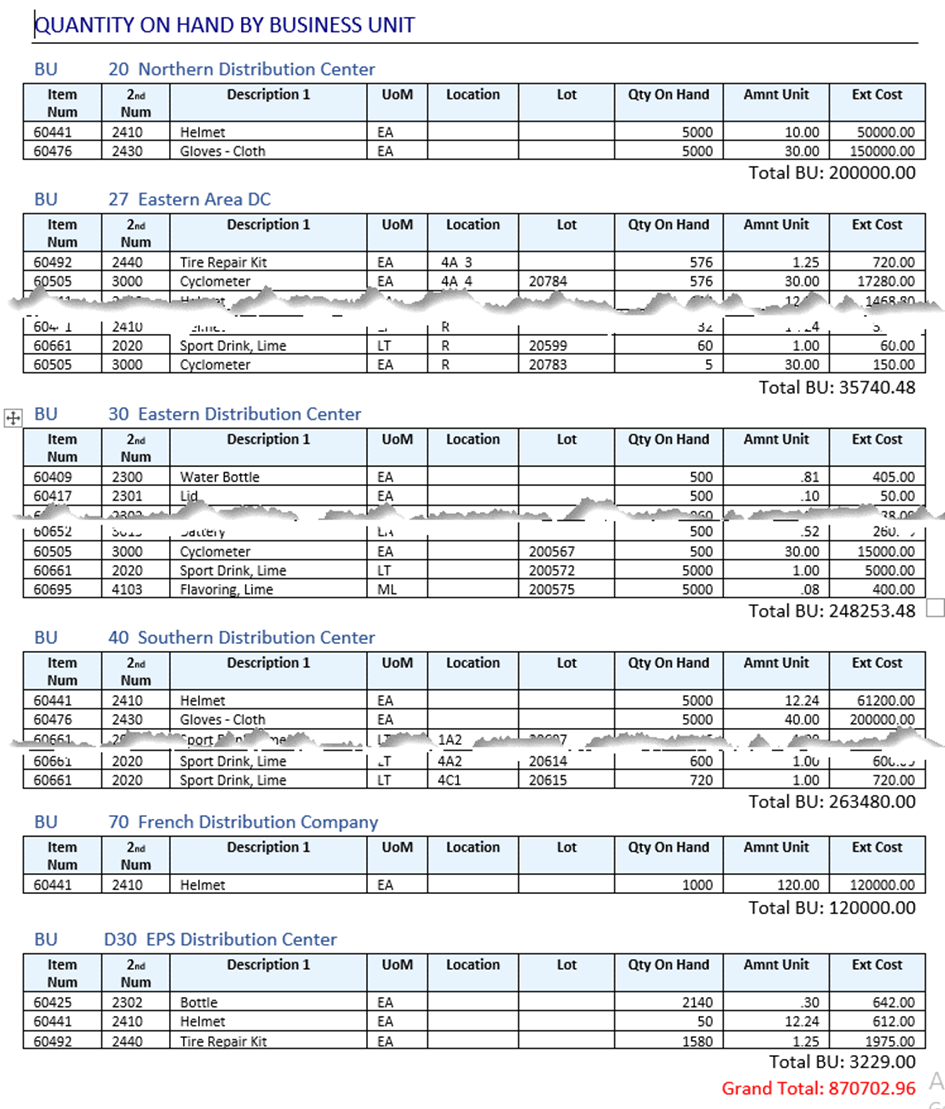
Figure 47
9. Add a second RTF Template object based on the same batch application
We will subsequently create a new template using the same batch application but this time with a grouping of data by GL category.
To this end, we follow the steps described above. In the following in this document, we limit ourselves to showing the main stages of the new report model.
- Open MS Word, create a new document and save the empty document in RTF format as QtyOH_byGLCat.rtf in your folder.
- In “XML Publisher Repository” (P95600) we add the new object.
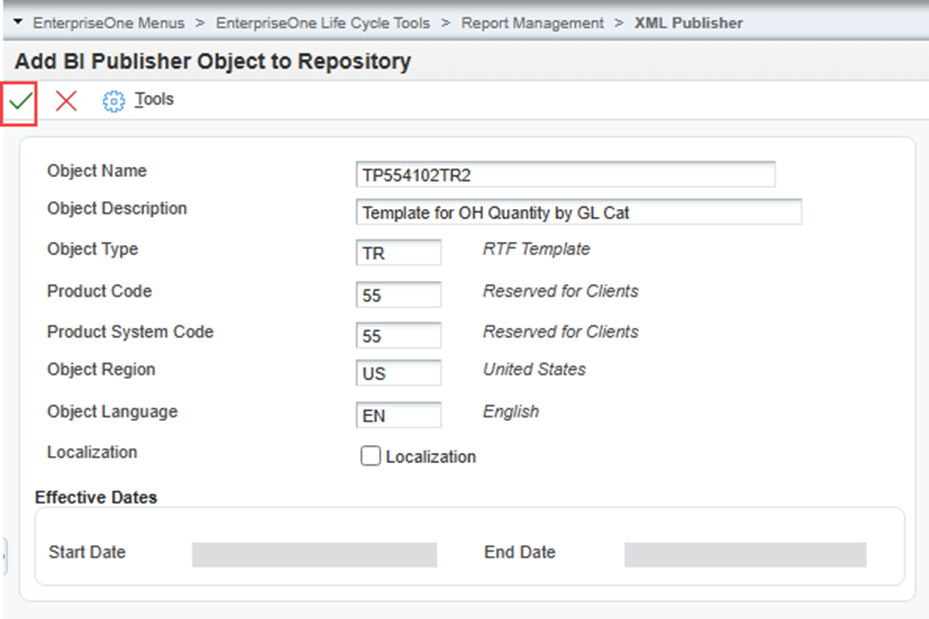
Figure 48
We upload the blank rtf document:

Figure 49
We now have 2 RTF Templates.
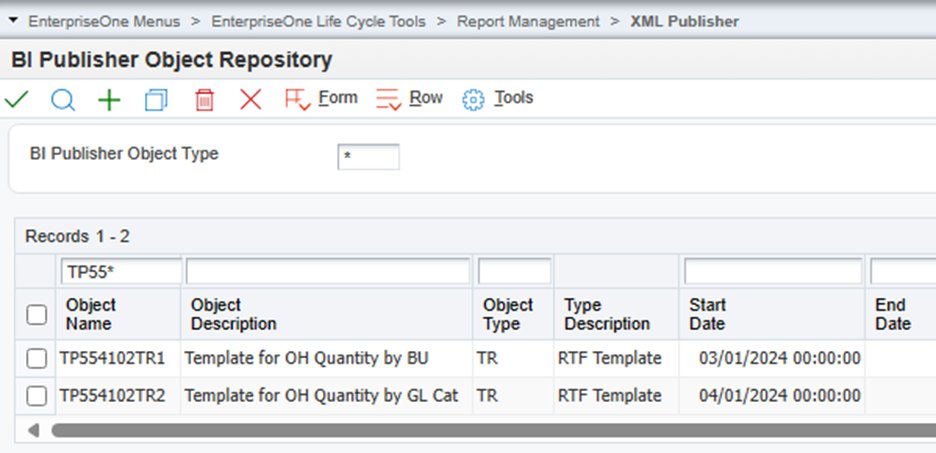
Figure 50
- In the P95620 app, select the previous report definition RD554102A. Click OK and add the second RTF template TP554102TR2 to the grid.
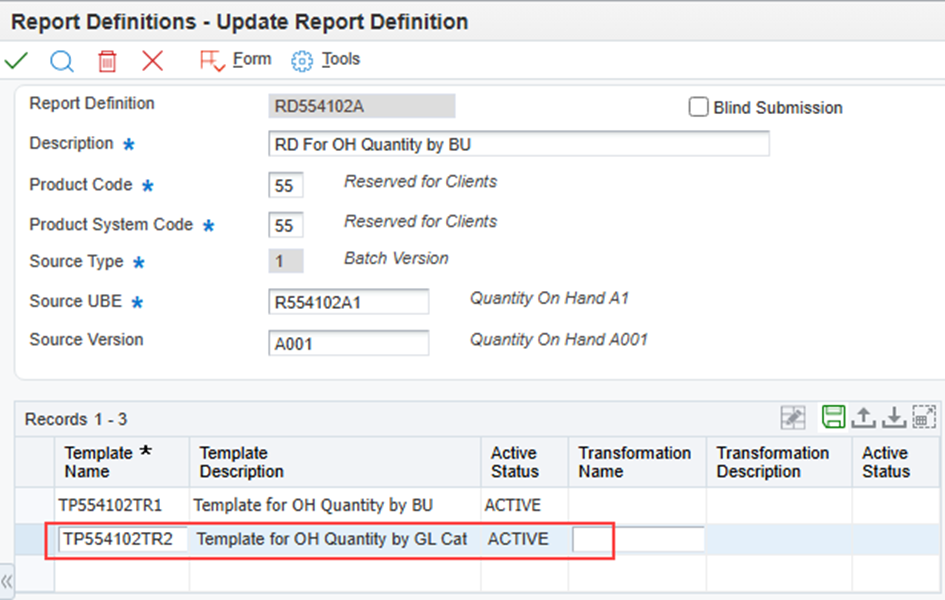
Figure 51
- Go back to Report Definitions app, select and submit RD554102A. An XML file is then generated in the PrintQueue folder.
- Open the blank RTF file QtyOH_byGLCAT.rtf created above in MS Word. Select the Publisher tab and click Sample XML. Browse to PrintQueue folder and select the new XML file. We can now design and save the new template.
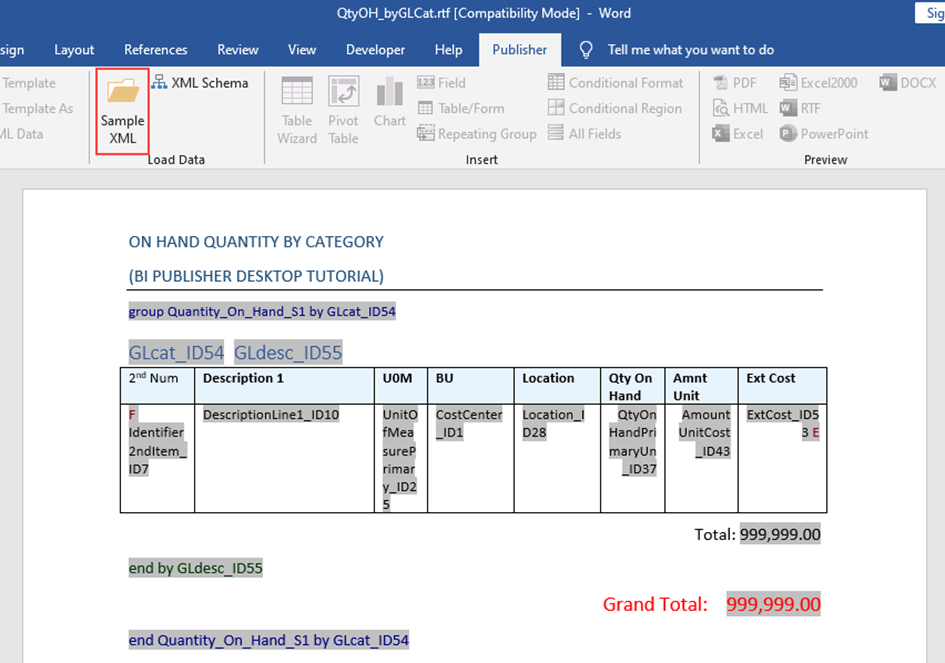
Figure 52
- Run BI Publisher Report Definition application (P95620) and resubmit the RD554102A report definition to download a new XML file to the PrintQueue folder.
-You can access your rtf document in 2 ways: The first is to access your folder and open your rtf document in Word. The second is to go back to the BI Publisher repository, select TP554102TR2 and click on Download in the Row Exit menu. The last method is more secure for your document because you will be working on a copy created in the PrintQueue folder.
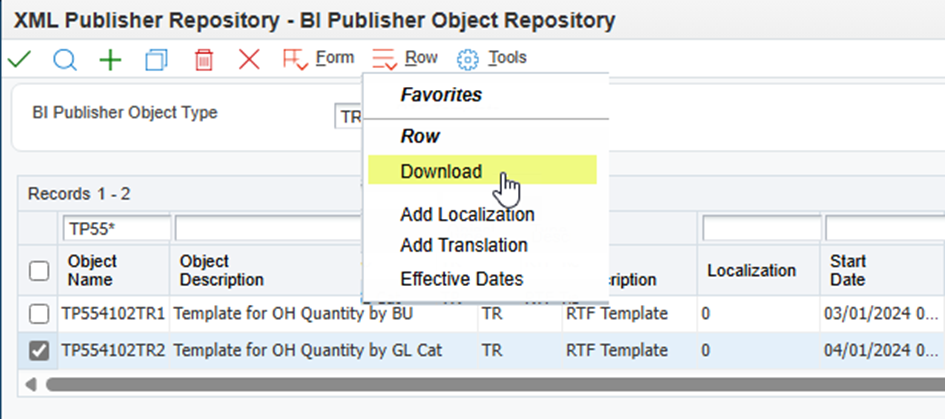
Figure 53
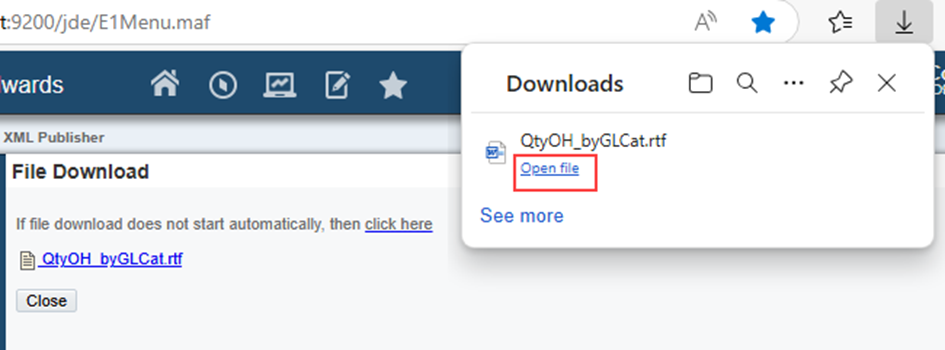
Figure 54
- In our document in Word, load the new XML file and select RTF in the preview group:
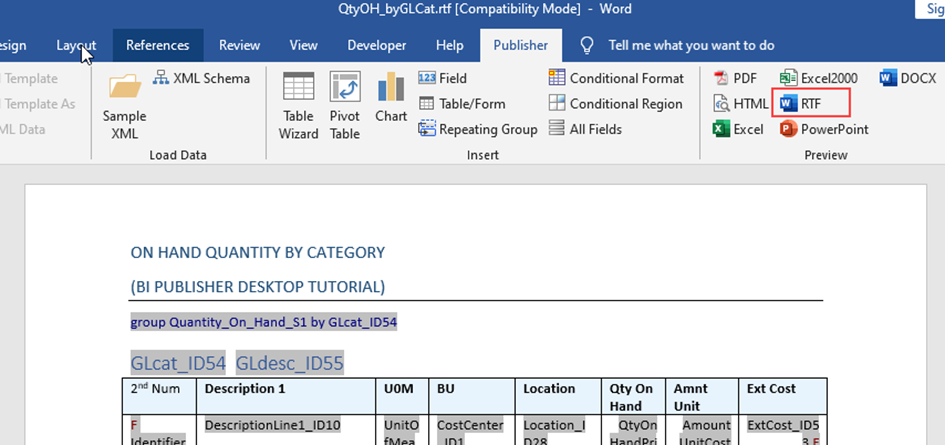
Figure 55
- The rtf report opens in Word with the data selected above.
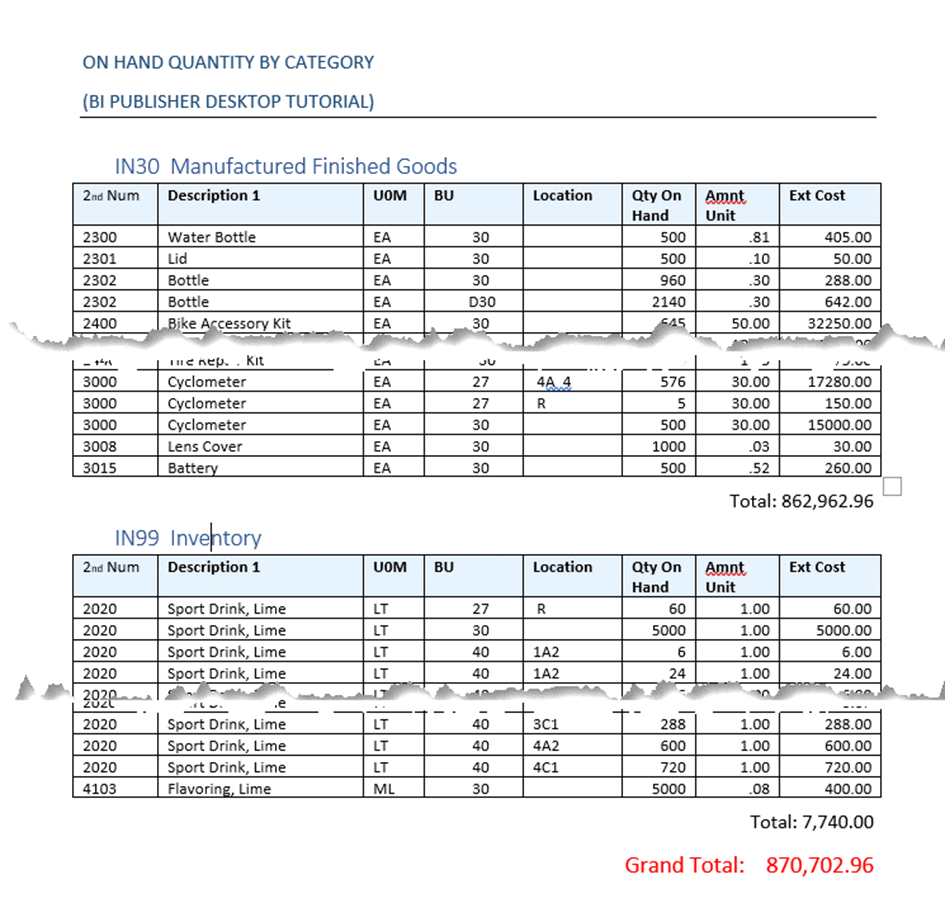
Figure 56
We have now finished our tutorial. We hope it helped you better understand BI Publisher Desktop, how to install it and use it in your daily work.
Until the next tutorial, we wish you a happy and prosperous new year.